Turbo Products
When do I know it’s time to replace my oil filter?
Oil filters usually start to show signs of malfunction due to wear and tear from grueling conditions like stop and go traffic, heavy loads, and extreme weather temperatures. And it’s because of these conditions that shorten the expected lifespan of the oil, and with it, the oil filter.
As time passes by, sediments and fine debris enter the engine oil. Because they are so tiny, they pass through the pistons, rings and cylinder walls and cause abrasive damage to the system and also become suspended in the engine oil.
What type of oil filter do I need?
Unfortunately, oil filters vary per vehicle and you will need to choose one according to your car’s specifications and your driving specifications. Fundamentally, when choosing an oil filter replacement, look for certain factors including size and capture efficiency, dirt-holding capacity, pressure flow, and design and fabrication integrity.
The type and construction of the media used to create the filter also directly affect the oil flow, capture efficiency, and dirt-holding capacity. Prospeed Parts has a variety of oil filters that cater to your specifications so you can choose a replacement without having to think twice.
How often should I replace my oil filter?
Generally, the rule of thumb is to replace your oil filter with every oil change. If you want to put a number on it, it’s said that you’ll need to replace both every 3,000 miles. However, be sure and read your vehicle’s operational manual first because specifications for maintenance and replacements do vary with each model. But with driving conditions that are ideal, meaning continuous driving on good roads and balanced temperatures sans consistent traffic jams and such, some vehicles wouldn’t have to change their oil or the filter for that matter sometimes up to 7,500 miles even.
How to change my oil filter?
You can save money from a trip to the shop and DIY the changing of your oil filter yourself.
-
- Run your engine but never up to a fully operational temperature. You’ll need warm oil to drain but not too hot that it compromises safety.
-
- Elevate the front of your vehicle and secure the brakes, adding extra stoppage on the wheels if it’s on a ramp. Locate the drain plug and slip a catch basin underneath.
-
- Loosen plug with a socket wrench and unscrew the rest of the way by hand. Take caveat as the oil can be hot.
-
- Drain the old oil but do so by also removing the filler cap on the top of the engine. As air enters the top, the old oil drains faster.
-
- Replace the oil plug by hand once the oil is drained. Be sure it’s not cross-threaded either. Finish it off with a wrench but don’t over tighten it.
-
- Using a filter wrench, remove the old oil filter and clean the surface on the engine where it was. Also, check that the old oil filter’s gasket is not stuck to the mounting surface.
-
- Lubricate the new filter’s seal with fresh oil and screw the filter on by hand making sure the seal is fitted properly in the filter.
-
- Pour in the new oil via a clean funnel without overfilling it. Replace the cap once finished.
-
- Check for leaks by running the engine. If there are none, shut off the engine and let it rest so the oil can drain down. If there is a leak, turn off the engine and fix it.
-
- Check the level of the oil with a dipstick and add the necessary oil until it reaches the “full mark.” Dispose of the old oil and filter properly at a registered recycling center.
How to remove a stuck oil filter?
When the oil filter gets stuck, an instinctive action is usually to drive a screwdriver into the oil filter and twist it. This will escalate the situation into a potential nightmare and can even damage the metal plate which is even harder to pry off. If you have a band style wrench, it’s best to use an 80 grit sandpaper with an adhesive backing that’s cut to fit the width of the band. Stick the sandpaper inside the clean surface of the band where the grit is facing the side of the filter. Some band style filter wrenches come with a permanent grit on the inside.
A clamping oil filter wrench also works on these kinds of situations because it tightens against the fluted end of the filter. So, the wrench grips more when you turn harder.
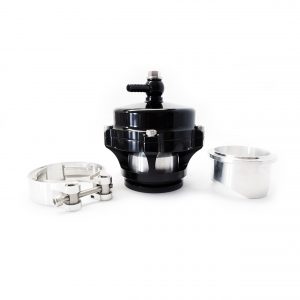
How does a boost controller work?
A boost controller changes the amount of pressure entering the water gate which then, in turn, controls the manifold pressure. “Boost” describes how pressurized the air has become in the intake. And because the air quantity pushed into the engine is directly related to the amount of air pressure that enters the intake, it results in a higher boost level. Boost controllers basically regulate the amount of pressure or boost that enters the engine. Any excess is bled through the water gate because too much boost can damage the engine.
Two types of boost controllers
There are two types of boost controllers that drivers can choose from and vary in their features, with one more technical than the other, requiring specific expertise with working with the turbo.
Mechancial – Mechanical or gated boost controllers are simpler and easier to fit. These require little maintenance and only offer two boost settings which can be controlled with a switch.
Electronic – Electronic boost controllers may be more complicated, requiring a lot more technical knowledge, especially when fitted. However, these are desirable to many because of their roster of features and flexibility. These offer a variety of boost settings which are charted against various triggers including the gear change, time, rpm and even through a manual switch.